Installation guide for OpsLogix VMware Management Pack for System Center Operations Manager
Installation guide
Welcome to the OpsLogix VMware Management Pack Installation Guide. Before proceeding with the installation, please take a moment to carefully review the license agreement attached in the installation folder.
Software Prerequisites:
-
Microsoft System Center Operations Manager:
- The OpsLogix VMware Management Pack requires one of the following versions:
- System Center Operations Manager 2016
- System Center Operations Manager 180x
- System Center Operations Manager 2019
- System Center Operations Manager 2022
- The OpsLogix VMware Management Pack requires one of the following versions:
-
Microsoft .NET Framework 4.8:
- Ensure that Microsoft .NET Framework 4.8 is installed on all SCOM Management Server and Gateway Servers that are resource pool members in the resource pool used for VMware monitoring.
VMware Compatibility
The OpsLogix Management Pack for VMware is compatible with the following VMware versions:
- VMware vCenter 6.5 or Higher
- VMware ESXi Host 6.5 or Higher
Monitoring Architecture
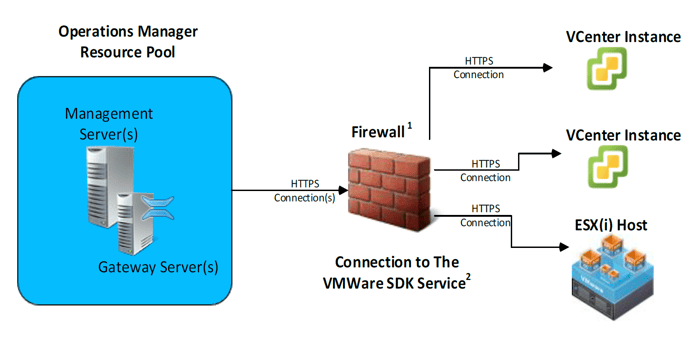
The VMware Management Pack is designed to monitor VMware environments using either a vCenter connection or a direct ESX(i) host connection. To effectively monitor the VMware environment, the OpsLogix VMware Management Pack utilizes an Operations Manager Resource Pool. This pool consists of one or more management/gateway servers that act as monitoring proxies to collect VMware monitor data and transmit monitoring information to Operations Manager.
Please follow these guidelines for configuring the Resource Pool:
- The resource pool member should be either a SCOM management server or SCOM gateway server.
- For optimal results, it is recommended to add 2 or more members to the pool. This setup ensures fail-safe and load balancing functionalities.
- In case one of the pool members goes down, the others will take over seamlessly.
- By default, the load is distributed evenly across the available members.
By adhering to these instructions, you will be able to set up an efficient and reliable VMware monitoring solution using the OpsLogix VMware Management Pack.
If you encounter any issues during the installation process or have any questions, please refer to the documentation or contact our support team for assistance. We hope you find this management pack beneficial for your VMware environment monitoring needs.

- If a Firewall is used it has to be configured to establish the VMWare SDK Service Connection
- The connection is configured in the Opslogix VMWare configuration dashboard using a VMWare FQDN to the vCenter server.
Please take into consideration that Operations Manager will automatically install the Opslogix VMware Collector Service on all SCOM pool members.
Configuration
The steps below show the process of installing and configuring the OpsLogix VMware Management Pack in your SCOM environment.
-
Import the Management Packs: Begin by importing the necessary Management Packs for OpsLogix VMware monitoring.
-
Add the License Key: Enter the license key provided for the OpsLogix VMware Management Pack.
-
Create a Monitoring Pool: Set up a monitoring pool in SCOM to organize and manage VMware-related monitoring activities effectively.
-
Configure the VMware Monitoring Account: Create a dedicated VMware monitoring account with appropriate permissions to access the vCenter or ESXi hosts.
-
Add VCenter or ESXi Connection(s): Establish connections to the VMware vCenter server or individual ESXi hosts that you want to monitor.
-
Assign Licenses to Hosts: Allocate licenses from the OpsLogix VMware Management Pack to the specific hosts you wish to monitor.
Importing the management packs
Before importing the OpsLogix VMware Management Pack make sure that the following files are available:
- OpsLogix.BaseLibrary.mp
Contains the root folders in the SCOM console - OpsLogix IMP – Licensing Dashboard Vx.x.x.x.mpb
Contains the generic licensing dashboard - OpsLogix IMP – VMware Base Management Pack.mpb
Contains the discovery of the VMware components - OpsLogix IMP – VMware Monitoring Management Pack.mpb
Contains the monitoring of the VMware components - OpsLogix IMP – VMware Hardware Management Pack.mpb
Contains the discovery and monitoring of physical hardware components - OpsLogix IMP – VMware Templates Management Pack.mpb
Contains the Alert templates to map / add custom vCenter alert monitors - OpsLogix IMP – VMware Dashboards Management Pack.mpb
Contains the various dashboards - OpsLogix IMP – VMware Reporting Management Pack.mpb
Contains the special VMware reports - OpsLogix IMP – VMWare Monitoring Groups Management Pack.mpb
Contains the group definition for more addon counter collection - OpsLogix IMP – VMWare Collector Management Pack.mpb
Contains the special OpsLogix VMware collector - OpsLogix IMP – Generic Reports Management Pack.mpb
Contains the Top10 and Matrix reports - OpsLogix IMP – VMware Configuration Dashboard Management Pack
Contains the VMware configuration dashboard
Optional:
- OpsLogix IMP – VMware AddOn vCenter Alert Monitoring Management Pack.mpb
Contains vCenter default alerts to be mapped to SCOM monitors - OpsLogix IMP – VMware Capacity Analysis Management Pack
Contains cluster (over)commitment monitoring - OpsLogix IMP – VMware Guest Monitoring Management Pack
Contains Virtual machine Guest OS state and Disk usage monitoring - OpsLogix IMP - VMware vSAN Dashboards Management Pack
Contains the dashboard for the vSAN monitoring - OpsLogix IMP - VMware vSAN Management Pack
Contains vSAN monitoring
To successfully import the OpsLogix VMware Management Pack, follow these steps:
-
Go to the "Administration" section in the Operations Manager Console.
-
Right-click on "Management Packs," then select "Import Management Packs..." -> "Add" -> "Add from Disk."
-
Browse to the location where you unpacked the OpsLogix VMware Management Pack.
-
Click "Open" and proceed to "Import" the Management Pack files. You can import .mp, .mpb, or .xml files from the software package, as illustrated above.
After importing the VMware Management Pack, depending on your SCOM environment, it takes about 15 minutes (or considerably longer if your SCOM environment is under heavy load) for all the components to deploy.
Adding the license key
Please see the KB article below to import the license key:https://www.opslogix.com/knowledgebase/importing-the-opslogix-vmware-mp-license-key
Add the monitoring pool
A resource pool enables the VMware Management Pack to offer high availability monitoring when using more than one System Center Operations Manager Management Server. The VMware MP provides a resource pool called “OpsLogix Resource Pool for VMware Management Pack” that contains all Management Servers by default. You can change the members or create a new resource pool by following the procedures in the next chapter.
Change the members of the resource pool
To change the members of the resource pool “OpsLogix Resource Pool for VMware Management Pack” follow the steps below
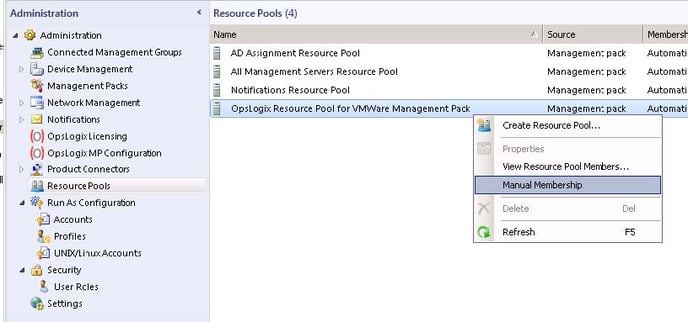
- In the Administration section of the SCOM console navigate to Administration -> Resource Pools and right-click OpsLogix Resource Pool for VMWare Management Pack. Select Manual Membership.

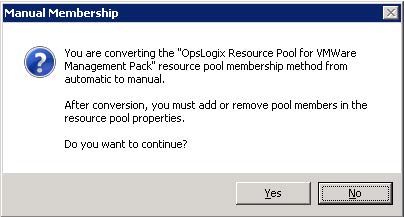
- Click Yes on the Manual Membership popup box.

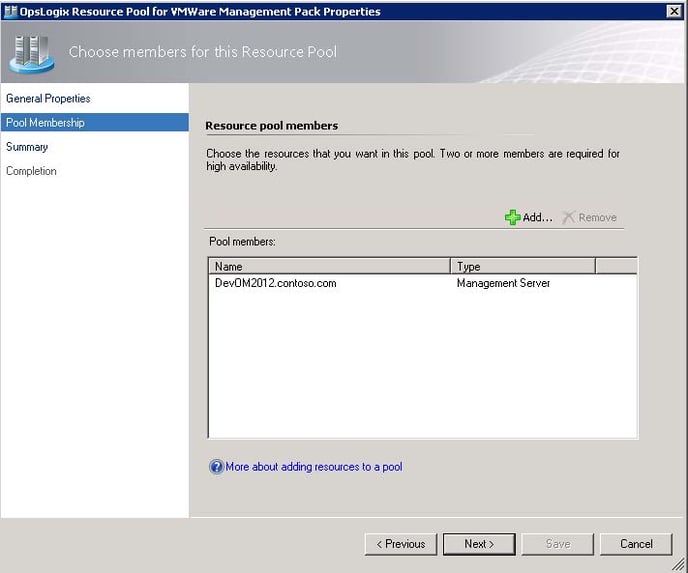
- Add or remove the Management Servers on which you would like the Management Pack to be able to run. Note: All Management Servers in the OpsLogix Resource Pool for VMWare Management Pack must be able to connect to the vCenter server in your VMware environment for the management pack to function correctly.

- Complete the OpsLogix Resource Pool for VMWare Management Pack Properties wizard.
Please note: If you add new members to a resource pool that was already monitoring a VMware connection you will have to do a “Check Connection” again to automatically deploy the OpsLogix Collector. See chapter 7.5
Creating a new resource pool
To create a new custom resource pool, follow the steps below.
- Log in to an Operations Manager Management Server with a user account that has administrator permissions in Operations Manager and open the Operations Console and navigate to the Administrator Pane. See Step 1 in the picture.
- Select the Resource Pools folder. See Step 2 in the picture.
- Now select: Create a new Resource Pool. See Step 3 in the picture.
- Add the members that you want to let act as the VMware monitoring proxy. See Step 4, 5 in the picture.
- Save the resource pool. See step 6 in the picture.
